Yesterday an MSP (Microsoft Student Partner) friend of mine asked me to help him out on a presentation on Microsoft Robotic Studio [http://msdn2.microsoft.com/en-us/robotics/default.aspx]. To be honest, I was ignorant of this studio’s existence till then. Robotic Studio is an IDE to create robotic applications for a wide variety of computing platforms. If you have taken any signal processing lecture, the whole studio will seem really familiar.
On this article I will try to show you how to create a simple win form control panel and use it as a service in order to control your robot. It will be like the Directional Dialogue that already exists in the service but it will have more buttons. Since I have not yet bought the Lego NXT Intelligent Brick (http://shop.lego.com/product/?p=9841&LangId=2057&ShipTo=US), we will end up with a control panel which will throw messages when a button is pressed instead of propagating these events to a real life robot.
The first think you should do, is create the solution where you will build the new service. Open the command prompt from the Microsoft Robotics Studio (1.5) program file menu. Robotic studio provides us with the dssnewservice utility which creates all the required projects plus it configures the post build events to copy the resulting dlls in the Robotics Studio bin folder. In our example we will create a new service using VB.net under the Robotics namespace and we shall call it MyWindowsFormInputService. That’s interpreted in the following command:
C:\Microsoft Robotics Studio (1.5)\samples>dssnewservice /namespace:Robotics /Service:MyWindowsFormInputService /language:VB
As you may have noticed, I created the solution inside the samples folder, which is not required. You may create the solution anywhere you like or you may even move it after creating it. Open the MyWindowsFormInput.sln using Visual Studio 2005. The solution contains one project with two classes which are both under the namespace Robotics.MyWindowsFormInput. This is an exaggeration since the project also declares the same namespace. Thus the generated classes end up under the namespace Robotics.MyWindowsFormInput.Robotics.MyWindowsFormInput. This problem only occurs in VB since in C# the classes need the namespace declaration. In order to solve this, you must remove the following declaration on both generated files:
Namespace Robotics.MyWindowsFormInput
End Namespace
Let us now start modifying the generated code to meet our needs. First of all we need to be able to provide notifications to other services. The services, with which our service is going to communicate, are called subscribers. In order to be able to keep trace of the subscribers, we will have to give them the opportunity to subscribe. This is why we need to define our subscription message which will inherit from the Microsoft.Dss.ServiceModel.Dssp.Subscribe message. Since we don’t need anything more that the default message, we will leave it to that. The declaration should be:
Public Class Subscribe
Inherits Subscribe(Of SubscribeRequestType, PortSet(Of SubscribeResponseType, Fault))
End Class
Declaring the Subscribe message type though is not enough. We have to let the other services know that our service supports the Subscribe message… Thus we have to add it in the MyWindowsFormInputOperations declaration. Let’s have a look on that class’s current declaration:
<ServicePort()> _
Public Class MyWindowsFormInputOperations
Inherits PortSet(Of DsspDefaultLookup, DsspDefaultDrop, [Get])
End Class
This means that we do support a [Get] message which is added for us, but we don’t need it. So replace the [Get] with Subscribe and you should have the following code:
Public Class MyWindowsFormInputOperations
Inherits PortSet(Of DsspDefaultLookup, DsspDefaultDrop, Subscribe)
End Class
If you want, you may delete the Public Class [Get] which is yet another message declaration, and we want need it. If you check the error list, we have 2 errors with description “Too few type arguments to 'Microsoft.Dss.ServiceModel.Dssp.Get(Of TBody, TResponse)'”. By clicking on them you will be transferred in the MyWindowsFormInput.vb file and to be more accurate in the start() sub and the GetHandler sub. As you may know, we have to register a handler for each supported message. The GetHandler sub handles any Get message while the
Arbiter.Receive(Of [Get])(True, _mainPort, AddressOf GetHandler)
line defines that any Get message will be handled by the GetHandler sub. In accordance to that we create the following handler sub:
Public Sub SubscribeHandler(ByVal subscribe As Subscribe)
End Sub
And modify the Arbiter.Receive line to:
Arbiter.Receive(Of Subscribe)(True, Me._mainPort, New Handler(Of Subscribe)(AddressOf Me.SubscribeHandler)) _
What we do need is a manager to keep track of our subscribing services. This is done by simply declaring a private variable (we shall call it _submgr) giving the following declaration:
<Partner("SubMgr", Contract:="http://schemas.microsoft.com/xw/2005/01/subscriptionmanager.html", CreationPolicy:=PartnerCreationPolicy.CreateAlways, Optional:=False)> _
Private _submgr As New Microsoft.Dss.Services.SubscriptionManager.SubscriptionManagerPort
Let’s have a closer look to that declaration. First of all _submgr is an instance of a standard DSS component. The Partner directive above it, may trouble you a bit. A partner is another service on which our service depends on. When our service starts, it creates a new instance of its partners. If a partner fails to start, our service will also fail to start. So what we actually do here is declare a partner service with the subscriptionmanager contract and we have a port in order to communicate which him.
Having declared the subscriptionmanager, we go back to the subscribe handler and modify it to use the subscribehelper method for the subscribe messages. The sub should look like:
Public Sub SubscribeHandler(ByVal subscribe As Subscribe)
Me.SubscribeHelper(Me._submgr, subscribe.Body, subscribe.ResponsePort)
End Sub
Since we got to know the messages a little better, we can now create a few more messages that we shall need. We shall need a ButtonPressEvent and a ButtonReleaseEvent message. They will be both inheriting from Microsoft.Dss.ServiceModel.Dssp.Update operation and they will be notifying when a button is pressed and released from the GUI. If you take a closer look in the update class through the Object browser you should see that it requires a TBody:
Public Class Update(Of TBody As New, TResponse As {New, Microsoft.Ccr.Core.IPort})
The TBody is the structure that will contain the transmitted date with this operation. So we will create a simple class called ButtonPressEventArgs which will contain the data that we will be sending whenever we press a button from the GUI. This class should look like this:
<DataContract()> _
Public Class ButtonPressEventArgs
'This is the name of the command to execute
Private _commandName As String
<DataMember()> _
Public Property CommandName() As String
Get
Return Me._commandName
End Get
Set(ByVal value As String)
Me._commandName = value
End Set
End Property
Public Sub New()
End Sub
Public Sub New(ByVal name As String)
Me._commandName = name
End Sub
End Class
It only contains a private member and a property called CommandName. Thus the ButtonPressEvent operation should be:
<DisplayName("ButtonPressEvent"), Description("Indicates when a button in the dialog is pressed.")> _
Public Class ButtonPressEvent
Inherits Update(Of ButtonPressEventArgs, PortSet(Of DefaultUpdateResponseType, Fault))
Public Sub New()
End Sub
Public Sub New(ByVal body As ButtonPressEventArgs)
MyBase.New(body)
End Sub
End Class
We shall create the ButtonReleaseEvent and ButtonReleaseEventArgs respectively:
<DataContract()> _
Public Class ButtonReleaseEventArgs
'This is the name of the command to execute
Private _commandName As String
<DataMember()> _
Public Property CommandName() As String
Get
Return Me._commandName
End Get
Set(ByVal value As String)
Me._commandName = value
End Set
End Property
Public Sub New()
End Sub
Public Sub New(ByVal name As String)
Me._commandName = name
End Sub
End Class
<DisplayName("ButtonReleaseEvent"), Description("Indicates when a button in the dialog is released.")> _
Public Class ButtonReleaseEvent
Inherits Update(Of ButtonReleaseEventArgs, PortSet(Of DefaultUpdateResponseType, Fault))
Public Sub New()
End Sub
Public Sub New(ByVal body As ButtonReleaseEventArgs)
MyBase.New(body)
End Sub
End Class
Having declared these to operations, we have to let the other services know that we do support them. Thus we return to the MyWindowsFormInputOperations and modify its declaration to look like the following:
<ServicePort()> _
Public Class MyWindowsFormInputOperations
Inherits PortSet(Of DsspDefaultLookup, DsspDefaultDrop, Subscribe, ButtonReleaseEvent, ButtonPressEvent)
End Class
And then we will go back to the MyWindowsFormInputService class and add two handlers for the new operations:
Public Sub ButtonPressEventHandler(ByVal e As ButtonPressEvent)
End Sub
Public Sub ButtonReleaseEventHandler(ByVal e As ButtonReleaseEvent)
End Sub
We will fix those two later on (when we do actually create the form). Respectively to the subscribe operation we have to modify the Start method by adding in the ExclusiveReceiverGroup the two new operations. The final ExclusiveReceiverGroup should look like the following:
New ExclusiveReceiverGroup _
( _
Arbiter.Receive(Of ButtonPressEvent)(True, _mainPort, AddressOf ButtonPressEventHandler), _
Arbiter.Receive(Of ButtonReleaseEvent)(True, _mainPort, AddressOf ButtonReleaseEventHandler) _
), _
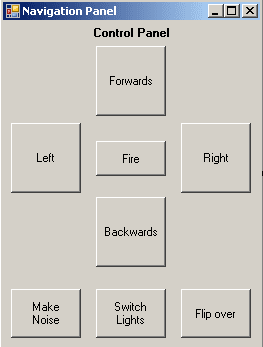
By now you shouldn’t have any error messages in the Error list. The next thing we shall do is create the control panel form. Add a new form in the project and name it NavigationPanel. Let us suppose that out Robot supports the following eight commands: move forwards, move backwards, turn left, turn right, fire, flip over, make noise and switch lights. The simplest navigation panel for our robot would look like the following image:

In order to minimize the code I have to write, I will be naming the buttons after the respective command by simply adding the cmd prefix. So the Fire button will be named cmdFire and the rest of them will be named cmdFlipOver,cmdMakeNoise,cmdMoveBackwards,cmdMoveForwards,cmdSwitchLights,cmdTurnLeft,cmdTurnRight. The argument that I will be sending on the respective event will be the name of the button without the cmd prefix. In order to be able to send messages, this form should get a reference to the MyWindowsFormInputOperations that the MyWindowsFormInputService has (the private variable _mainPort). The simplest way to do that is by overriding the constructor and passing a reference there and storing it in a private variable called _mainPort.
Private _mainPort As MyWindowsFormInputOperations
Using this variable I will be able to Post messages. So I do create two sub to handle the mousedown and the mouseup of my buttons
Private Sub button_MouseDown(ByVal sender As Object, ByVal e As MouseEventArgs)
If TypeOf sender Is System.Windows.Forms.Button Then
Dim button As System.Windows.Forms.Button = CType(sender, System.Windows.Forms.Button)
Dim CommandName As String = GetCommandFromButton(button)
Me._mainPort.Post(New ButtonPressEvent(New ButtonPressEventArgs(CommandName)))
End If
End Sub
Private Sub button_MouseUp(ByVal sender As Object, ByVal e As MouseEventArgs)
If TypeOf sender Is System.Windows.Forms.Button Then
Dim button As System.Windows.Forms.Button = CType(sender, System.Windows.Forms.Button)
Dim CommandName As String = GetCommandFromButton(button)
Me._mainPort.Post(New ButtonReleaseEvent(New ButtonReleaseEventArgs(CommandName)))
End If
End Sub
'Removes the cmd from the button name and returns the remaining text
Private Function GetCommandFromButton(ByRef button As Button) As String
Return button.Name.Substring(3)
End Function
The two sub, simply post a new message with the appropriate body (arguments). I should also register the buttons event handlers in the constructor, so the new sub whould look like:
Public Sub New(ByRef mainPort As MyWindowsFormInputOperations)
Me.InitializeComponent()
'store the reference to the mainport
_mainPort = mainPort
'Add event listeners to button events
AddHandler cmdFire.MouseDown, AddressOf button_MouseDown
AddHandler cmdFlipOver.MouseDown, AddressOf button_MouseDown
AddHandler cmdMakeNoise.MouseDown, AddressOf button_MouseDown
AddHandler cmdMoveBackwards.MouseDown, AddressOf button_MouseDown
AddHandler cmdMoveForwards.MouseDown, AddressOf button_MouseDown
AddHandler cmdSwitchLights.MouseDown, AddressOf button_MouseDown
AddHandler cmdTurnLeft.MouseDown, AddressOf button_MouseDown
AddHandler cmdTurnRight.MouseDown, AddressOf button_MouseDown
AddHandler cmdFire.MouseUp, AddressOf button_MouseUp
AddHandler cmdFlipOver.MouseUp, AddressOf button_MouseUp
AddHandler cmdMakeNoise.MouseUp, AddressOf button_MouseUp
AddHandler cmdMoveBackwards.MouseUp, AddressOf button_MouseUp
AddHandler cmdMoveForwards.MouseUp, AddressOf button_MouseUp
AddHandler cmdSwitchLights.MouseUp, AddressOf button_MouseUp
AddHandler cmdTurnLeft.MouseUp, AddressOf button_MouseUp
AddHandler cmdTurnRight.MouseUp, AddressOf button_MouseUp
End Sub
In order to be able to validate that the body of each message is valid I will add in this form a shared readonly property which shall give me a List(of string) listing the available commands. The code should be the following:
Private Shared Sub InitializeAvailableCommands()
_AvailableCommands = New List(Of String)
_AvailableCommands.Add("Fire")
_AvailableCommands.Add("FlipOver")
_AvailableCommands.Add("MakeNoise")
_AvailableCommands.Add("MoveBackwards")
_AvailableCommands.Add("MoveForwards")
_AvailableCommands.Add("SwitchLights")
_AvailableCommands.Add("TurnLeft")
_AvailableCommands.Add("TurnRight")
End Sub
Private Shared _AvailableCommands As List(Of String)
Public Shared ReadOnly Property AvailableCommands() As List(Of String)
Get
If _AvailableCommands Is Nothing Then
InitializeAvailableCommands()
End If
Return _AvailableCommands
End Get
End Property
Now we are ready to implement the ButtonPressEventHandler and the ButtonReleaseEventHandler to sendnotifications to other services.
Public Sub ButtonPressEventHandler(ByVal e As ButtonPressEvent)
If NavigationPanel.AvailableCommands.Contains(e.Body.CommandName) Then
e.ResponsePort.Post(DefaultUpdateResponseType.Instance)
Me.SendNotification(Of ButtonPressEvent)(Me._submgr, e)
Else
e.ResponsePort.Post(W3C.Soap.Fault.FromCodeSubcodeReason(W3C.Soap.FaultCodes.Receiver, _
DsspFaultCodes.UnknownEntry, (String.Format("Unknown command {0}!", e.Body.CommandName))))
End If
End Sub
Public Sub ButtonReleaseEventHandler(ByVal e As ButtonReleaseEvent)
If NavigationPanel.AvailableCommands.Contains(e.Body.CommandName) Then
e.ResponsePort.Post(DefaultUpdateResponseType.Instance)
Me.SendNotification(Of ButtonReleaseEvent)(Me._submgr, e)
Else
e.ResponsePort.Post(W3C.Soap.Fault.FromCodeSubcodeReason(W3C.Soap.FaultCodes.Receiver, _
DsspFaultCodes.UnknownEntry, (String.Format("Unknown command {0}!", e.Body.CommandName))))
End If
End Sub
There is only one last thing left to get this ready. We have to invoke the form. As you may imagine this should occur in the start method, but first we have to add a reference to Ccr.Adapters.WinForms.dll located in C:\Microsoft Robotics Studio (1.5)\bin\.
After that, we need to create a method in the MyWindowsFormInputService class that will create the new form instance. Let’s call it CreateNavigationPanelForm:
Public Function CreateNavigationPanelForm() As System.Windows.Forms.Form
Return New NavigationPanel(_mainPort)
End Function
Having this function we may now modify the start method and add the following line exactly below the DirectoryInsert() call:
Me.WinFormsServicePort.Post(New Microsoft.Ccr.Adapters.WinForms.RunForm(New Microsoft.Ccr.Adapters.WinForms.WinFormConstructor(AddressOf CreateNavigationPanelForm)))
That’s all about it. No more coding from here on… What we do have to do is build the project. You can do that by either pressing the build button in the Visual studio or by opening once again the command prompt through the Robotic studio and issuing the following command:
C:\Microsoft Robotics Studio (1.5)\samples\MyWindowsFormInput>msbuild MyWindowsFormInput.sln
As you should notice the output is copied directly inside the C:\Microsoft Robotics Studio (1.5)\bin folder and there are also a .proxy.dll and a .transform.dll with the same name. All these files are required in order to be able to use your service inside the Robotics Studio.
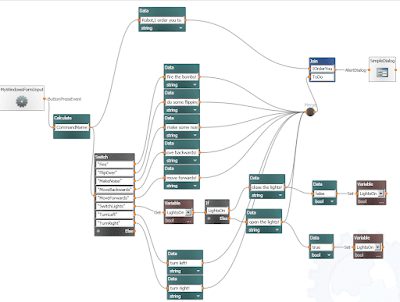
Now it’s time to fire up the Visual Programming Language. If everything went fine, the new service will be listed in Services panel as MyWindowsFormInput. To test it you may create the following diagram:

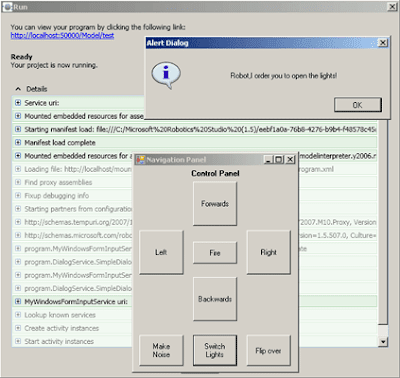
Running it will give you the following screen:

This concludes the how to create a window form and use it as an input service in Microsoft Robotics Studio. Please note that I have been playing around with Robotic Studio for less than a day and thus my knowledge is not deep enough to be able to explain what is going on under the hood but still I hope someone may find this useful at least to begin with.
Resources: